Customizing menu items
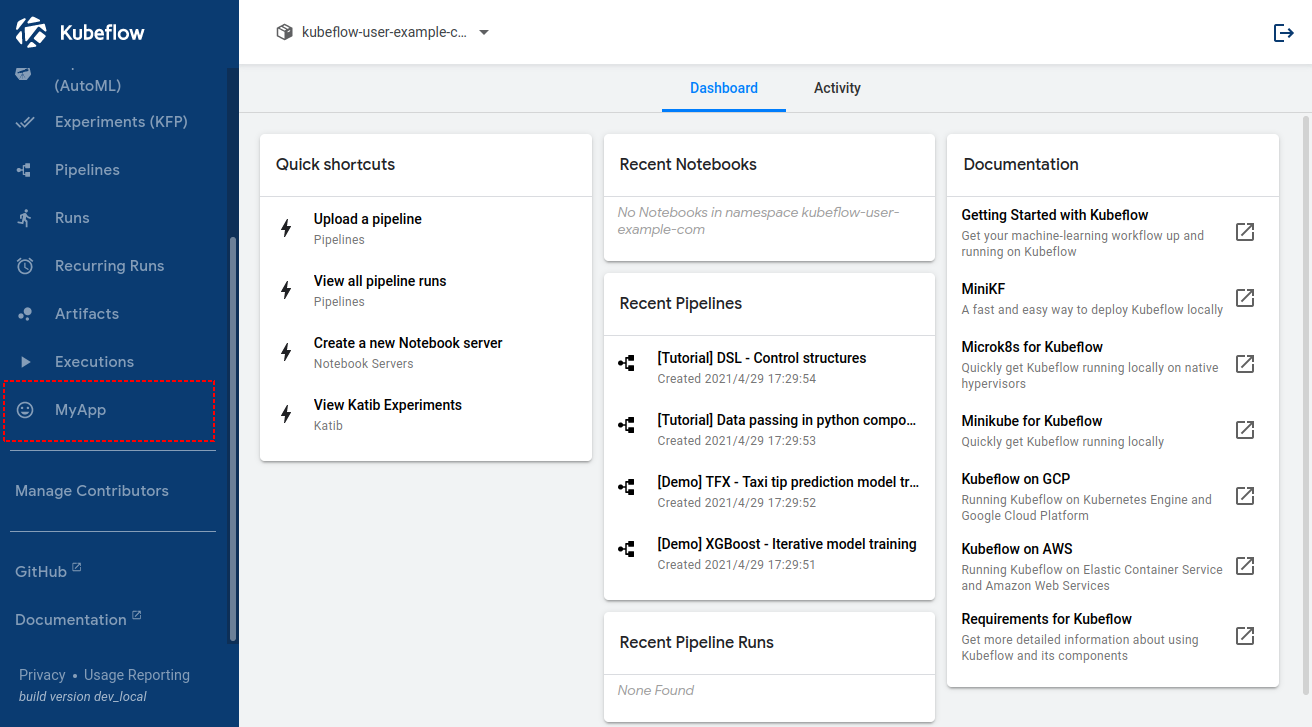
Cluster admin can integrate third party apps with kubeflow. In a below example, “My App” is added on the side menubar.

Add shared items
The way to add items shared by all users is described in this section.
First, the cluster admin should deploy the application as a microservice in Kubernetes. The traffic to the app should be set as a VirtualService of Istio.
Deploying with specific prefix and controlling the traffic by it is an instant way. In this case, the new app can be accessed from the below URL.
http(s)://gateway/_/myapp/
Next, the configuration of menubar can be opened as below.
kubectl edit cm centraldashboard-config -n kubeflow
You would see the current settings. Please add new item as you want.
apiVersion: v1
data:
  links: |-
    {
      "menuLinks": [
        {
          "type": "item",
          "link": "/jupyter/",
          "text": "Notebooks",
          "icon": "book"
        },
.
.
.
        {
          "type": "item",
          "link": "/pipeline/#/executions",
          "text": "Executions",
          "icon": "av:play-arrow"
        },
        {
          "type": "item",
          "link": "/myapp/",
          "text": "MyApp",
          "icon": "social:mood"
        }
      ],
“icon” can be chosen from iron-icons. You can see the list of iron-icons in this icon-demo.
The change of configuration would be reflected soon. If not, please rollout centraldashboard and reload the web browser.
kubectl rollout restart deployment centraldashboard -n kubeflow
You would see a new item (in this case, it is MyApp) on the menubar.
By clicking that button, you can jump to http(s)://gateway/_/myapp/ and access the third party app through the kubeflow dashboard.
Add namespaced items
The way to split the resouce of additional apps is described in this section.
Although Kubeflow has the functions for multi tenancy, some third party apps can’t interact with kubeflow profiles or don’t support multi tenancy.
The universal way to handle this problem is deploying the app for each namespace. The cluster admin deploy the app for each namespace and URLs would be like below.
http(s)://gateway/_/myapp/profile1/
http(s)://gateway/_/myapp/profile2/
In this case, you can configure the central dashboard as below.
{ns} should be replaced by the namespace when the user open the dashboard.
apiVersion: v1
data:
  links: |-
    {
      "menuLinks": [
        {
          "type": "item",
          "link": "/jupyter/",
          "text": "Notebooks",
          "icon": "book"
        },
.
.
.
        {
          "type": "item",
          "link": "/pipeline/#/executions",
          "text": "Executions",
          "icon": "av:play-arrow"
        },
        {
          "type": "item",
          "link": "/myapp/{ns}",
          "text": "MyApp",
          "icon": "social:mood"
        }
      ],
The users can see a new item (in this case, it is MyApp as well) on the menubar.
They can either jump to http(s)://gateway/_/myapp/profile1/ or http(s)://gateway/_/myapp/profile2/ based on the namespace selection.
The actual inside content of iframe is swiched by the namespace.
If sidecar injection is enabled, the authorization to the app is done by istio.
e.g) The users who don’t belong to profile2 can’t access to http(s)://gateway/_/myapp/profile2/.
Feedback
Was this page helpful?
Glad to hear it! Please tell us how we can improve.
Sorry to hear that. Please tell us how we can improve.